User Guide
Welcome to PeopleSoft!
PeopleSoft is a desktop application for calculating the salary for shift-based contractors, optimized for use via a command-line interface (CLI). If you are a HR manager and you can type fast, PeopleSoft can get your payroll tasks done much faster than traditional graphical user interface (GUI) applications.
You can input your employees’ data and the jobs that you want to keep track of. Then, you can assign the employees to the jobs that they are working on. After the job is completed, you can mark the job as paid, and PeopleSoft will calculate how much each employee is to be paid based on their hourly rates. You can also generate a payslip in comma-separated values (CSV) format for you and your employees to refer to.
PeopleSoft simulates a real life workflow:
- The company receives a new job.
- The HR manager
adds the job to PeopleSoft, andassigns employees to work on it. - The employees start working.
- When the employees complete the job, the HR manager
marks the job as completed. - Once it is time to pay the employees,
payout the job andexportthe payslips for the employees.
How to use this guide
If this is your first time using PeopleSoft, we recommend that you read the user guide in order. If you come across unfamiliar terms used in this user guide, their definitions may be found in the glossary.
If you are searching for information about specific features, you might find the command summary section useful in providing a brief overview of all commands. Alternatively, you may choose to navigate to the relevant sections of the user guide from the table of contents for more detailed explanations of features.
| Syntax | Purpose |
|---|---|
words in monospace font |
Commands to be typed into PeopleSoft |
| Contain relevant tips for using PeopleSoft | |
| Contain important warnings |
- How to use this guide
- Quick start
- Command summary
- Features
- FAQ
- Glossary
Quick start
Running PeopleSoft for the first time
-
Ensure you have Java 11 or above installed on your computer. Follow this guide to do so.
-
Download the latest version of
peoplesoft.jarfrom here. -
Place the
peoplesoft.jarfile anywhere on your computer (preferably within a new folder, as the configuration and data files will be stored in the same location). -
Double-click the file to start PeopleSoft. A window (similar to the one below) should appear shortly.
![]() Note: If double-clicking the file does not start PeopleSoft, then open the command line interpreter for your system (e.g. Command Prompt or Windows Terminal on Windows, or Terminal on macOS and Linux), navigate to directory where the file is located (e.g. with
Note: If double-clicking the file does not start PeopleSoft, then open the command line interpreter for your system (e.g. Command Prompt or Windows Terminal on Windows, or Terminal on macOS and Linux), navigate to directory where the file is located (e.g. with cd path/to/folder), and run java -jar peoplesoft.jar.
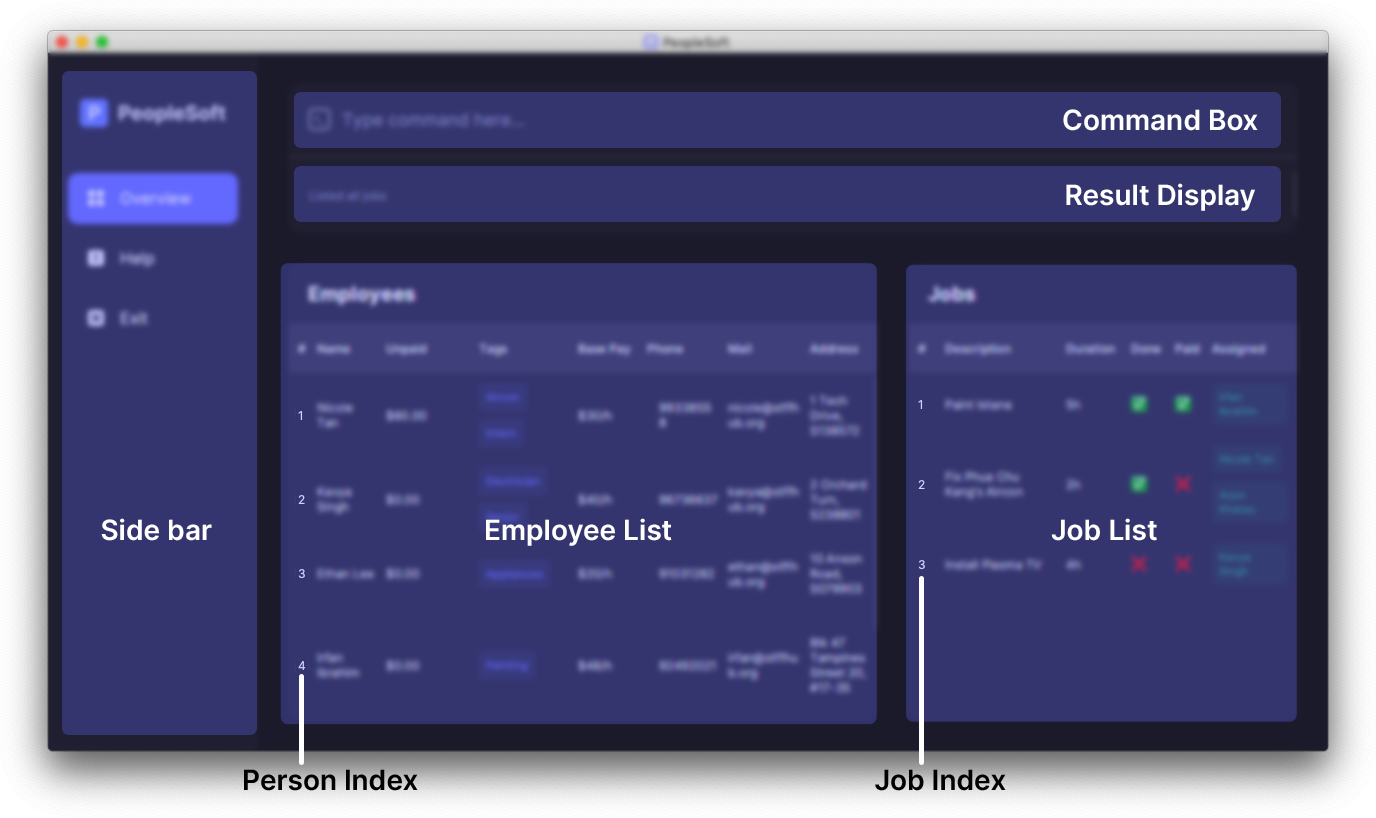
When PeopleSoft is started for the first time, it will be populated with sample data. You may delete this data with the clear command.
A data folder and some configuration files (with a .json extension) will also be created in the folder that you run peoplesoft.jar from; this is where PeopleSoft data will be stored.
Return to the Table of Contents
Processing your first payment using the sample data
The sample data is meant to help users get started with PeopleSoft. This is a tutorial of some basic features of PeopleSoft using the provided sample data. As such, it is not a comprehensive overview of every feature in PeopleSoft. You can refer to the features section for more information about specific features.
To start off, notice that the sample data contains some employees under the list of employees. Here, you can see the details of the employees, including their name, base pay and tags.
Since the sample data does not include any jobs, we will need to create new ones.
Create a job
When your company receives a new job, you can add it to PeopleSoft. To create a job, you can use the add command. You will have to specify a name and duration using the n/ and d/ prefixes respectively. For this tutorial, we will create a two-hour-long aircon repair job.
-
Type
add n/Repair aircon d/2in the command box.This command will add a new job with the name “Repair aircon” and a duration of two hours.
 Note: The attributes prefixed by
 n/andd/can be in any order. -
Hit Enter to run the command.
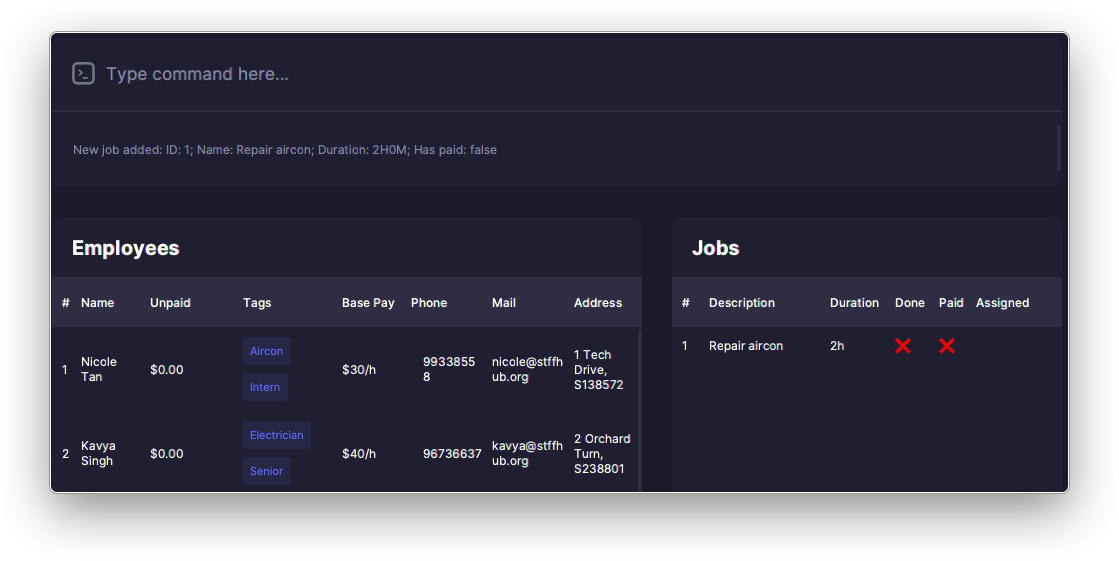
A job with the name "Repair aircon" and a duration of two hours is created in the job list
Assign employee to a job
PeopleSoft allows you to indicate which employees are in-charge of a certain job with the assign command. The assign command requires 1 job index, and at least 1 employee index (each prefixed by i/). These indexes can be found under the # column in both lists.
-
Type
assign 1 i/1in the command box.The first number in the command (
1) refers to the index of the job. In this case, it refers to the first job in the list of jobs, which is the aircon repair job created earlier.The prefix
i/denotes the index of the employee to be assigned to the job. In this case, it references the first employee in the list of employees, which is “Nicole Tan”. Additional employees can also be assigned to this job by adding additionali/attributes. -
Hit Enter to run the command.
A message should appear, indicating that the job “Repair aircon” is assigned to “Nicole Tan”.
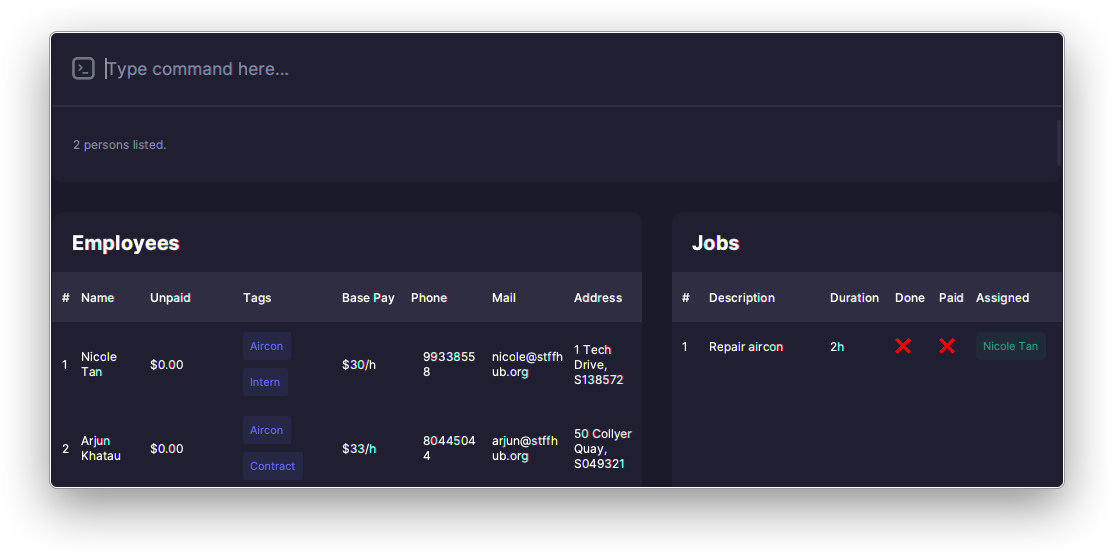
Nicole Tan is assigned to the "Repair aircon" job
![]() Note: Index-based commands depend on the ordering of the items displayed in their respective lists. The search and list commands for employees and jobs can cause this order to vary.
Note: Index-based commands depend on the ordering of the items displayed in their respective lists. The search and list commands for employees and jobs can cause this order to vary.
Find employees who are qualified
-
Type
personfind airconin the command box.This command searches for “aircon” in the names or tags of employees. Search terms are not case-sensitive.
-
Hit Enter to run the command.
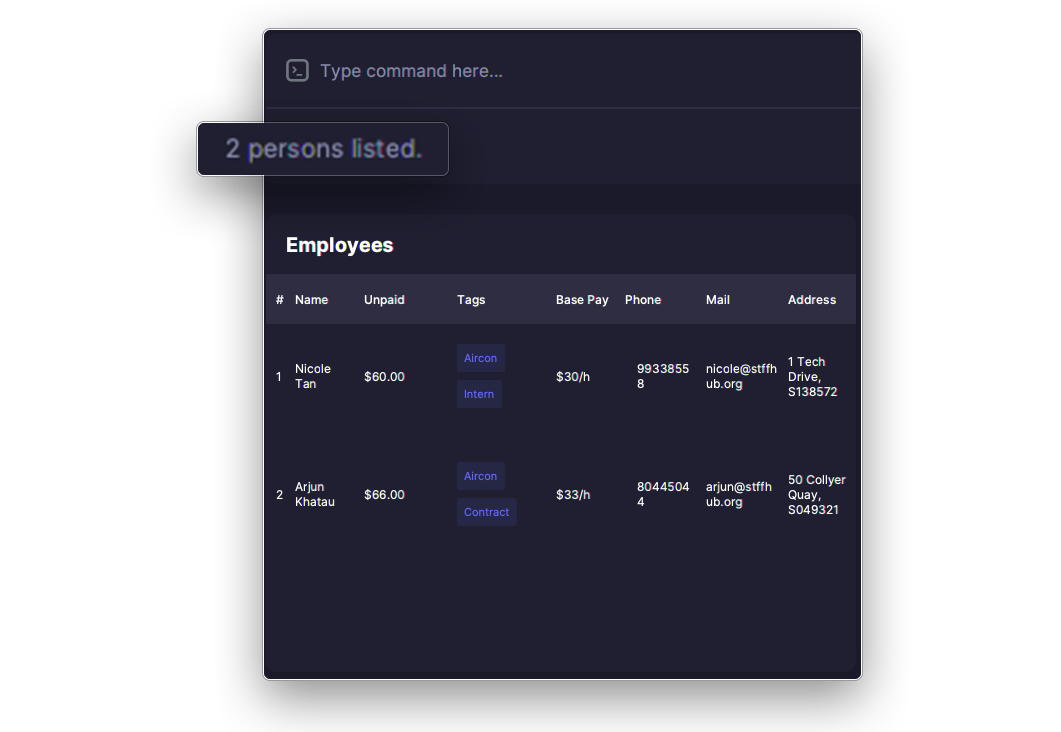
There should be two employees listed: “Nicole Tan”, and “Arjun Khatau”. Notice that the list of employees now only shows employees with the “Aircon” tag.
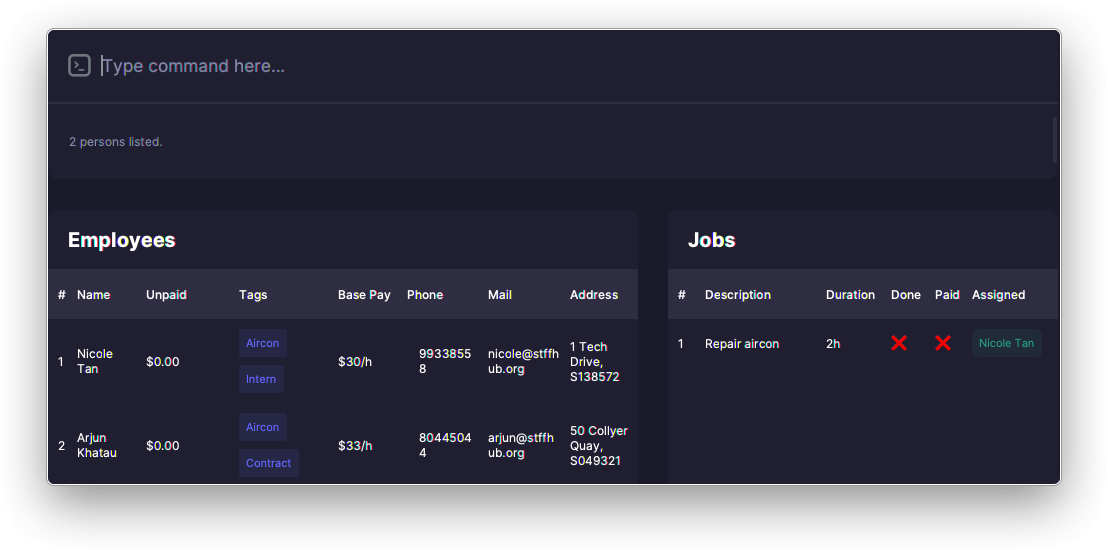
Nicole and Arjun are have the "Aircon" tag -
Type
assign 1 i/2in the command box.This assigns the second employee in the list (Arjun Khatau) to the first job. Notice that the employee index (2) now refers to the second employee in the current list (Arjun Khatau), instead of in the original list (Kavya Singh).
-
Hit Enter to run the command.
A message should appear, indicating that the job “Repair aircon” is assigned to “Arjun Khatau”.
Complete a job and pay employees
A key feature of PeopleSoft is tracking the state of job completion and whether its payment has been processed; this can be done with the mark and pay commands, respectively.
-
Type
mark 1in the command box.This command marks the first job as completed.
-
Hit Enter to run the command.
The job “Repair aircon” should be marked as completed, and a checkmark
 should appear under the Done column.
Marking a job as completed creates pending payments for the job. The amounts pending payment are reflected in the Unpaid column in the employees list.
Now that the “Repair aircon” job has been marked as completed, “Nicole Tan” and “Arjun Khatau” should have non-zero values under the Unpaid column.
This value reflects the amount of money that is pending payment to the employees. It is calculated from the employee’s base rate and the job’s duration.
-
Type
pay 1 y/in the command box.The prefix
y/is a safeguard against accidental misuse of this command. This command finalizes payments for the given job, and is irreversible. After the job is finalized, it cannot be further modified, so do make sure that you intend to run this command before running it. -
Hit Enter to run the command.
The payments for the job is now finalized, indicating that the employees have been paid for the job. This is also reflected in the checkmark
 under the Paid column.
The job list after the job is marked as done and payments are finalised
Export employee payslips
PeopleSoft also allows users to export a payslip for each employee as a comma-separated values (CSV) spreadsheet.
-
Type
export 1in the command box.This command exports the payslip for the first employee (Nicole Tan) to a CSV spreadsheet.
-
Hit Enter to run the command.
The payslip beginning with the employee’s name is now saved in the PeopleSoft
datafolder.
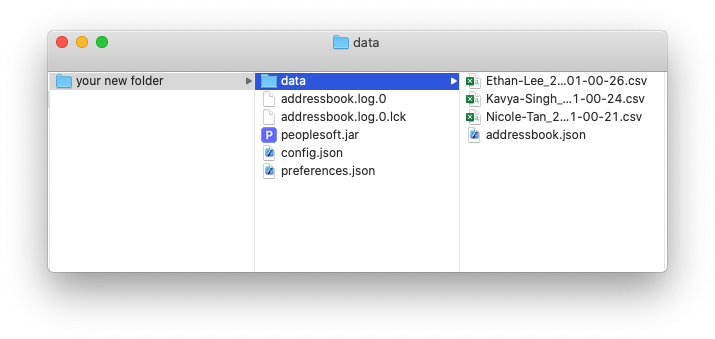
This concludes the tutorial on the basic usage of PeopleSoft. You can refer to the features section for more information about specific features. To clear the sample data, run the clear command.
Return to the Table of Contents
Command summary
A handy reference for more experienced users who just need to know the format of a command.
| Command | Format | Examples |
|---|---|---|
personadd |
personadd n/NAME p/PHONE_NUMBER e/EMAIL a/ADDRESS r/RATE [t/TAG]... |
personadd n/Nicole Tan p/99338558 e/nicole@stffhub.org a/1 Tech Drive, S138572 r/37.50 t/Hardware t/Senior |
personedit |
personedit EMPLOYEE_INDEX [n/NAME] [p/PHONE_NUMBER] [e/EMAIL] [a/ADDRESS] [r/RATE] [t/TAG]... |
personedit 2 n/Nicole Lee t/OS |
persondelete |
persondelete EMPLOYEE_INDEX |
persondelete 3 |
personfind |
personfind KEYWORD [KEYWORD]... |
personfind Nicole Hardware, personfind Aircon
|
personlist |
personlist |
NA |
export |
export EMPLOYEE_INDEX |
export 2 |
clear |
clear |
NA |
add |
add n/NAME d/DURATION |
add n/Fix HDB Lock d/1 |
find |
find KEYWORD [KEYWORD]... |
find Painting Senior, find Painting
|
list |
list |
NA |
delete |
delete JOB_INDEX |
delete 3 |
assign |
assign JOB_INDEX i/EMPLOYEE_INDEX [i/EMPLOYEE_INDEX]... |
assign 2 i/1 |
mark |
mark JOB_INDEX |
mark 2 |
pay |
pay JOB_INDEX y/ |
pay 2 y/ |
exit |
exit |
NA |
help |
help |
NA |

![]() Notes about the command format:
Notes about the command format:
-
Words in
UPPERCASEare the attributes to be replaced with values provided by you.
e.g. inpersonadd n/NAME,NAMEcan be replaced with an actual name like inpersonadd n/John Doe. -
Attributes can be in any order.
e.g. if the command asks forn/NAME p/PHONE_NUMBER,p/PHONE_NUMBER n/NAMEis also fine. -
If an attribute is expected only once but is used multiple times, only the last occurrence of the attribute will be taken.
e.g. if you specifyn/Jake n/Jason, onlyn/Jasonwill be taken. -
For commands that do not need attributes (like
help,list,exitandclear), anything typed after the command word will be ignored.
e.g.help 123will be interpreted ashelp. -
Items in square brackets are optional.
e.g.n/NAME [t/TAG]can be specified asn/John Doe t/friendorn/John Doe. -
Items with ellipses (
...) after them indicate that the items can be repeated any number of times.
e.g.[t/TAG]...can be interpreted as[t/TAG],[t/TAG] [t/TAG], and so on.
Parameter constraints
A handy reference for the constraints on input parameters for commands.
| Parameter | Prefix | Constraints |
|---|---|---|
| Name | n/ |
Contains only alphanumeric characters and spaces. Should not be empty. |
| Phone number | p/ |
Contains only numbers. Should be at least three digits long. |
e/ |
Should be of the format
|
|
| Address | a/ |
Should not be empty. |
| Rate | r/ |
Should be a number consisting of only digits Should not be negative. Should not have more than two decimal places. Should not be larger than |
| Tag | t/ |
Contains only alphanumeric characters. Should not be empty. |
| Duration | d/ |
Should be a number consisting of only digits Should be positive. Should not be larger than Should not be empty. |
| Employee to assign | i/ |
Contains only digits Should be a valid index of an employee in the employee list. Should not be empty. |
| JOB_INDEX | N.A. |
Contains only digits Should be a valid index of a job in the job list. Should not be empty. |
| EMPLOYEE_INDEX | N.A. |
Contains only digits Should be a valid index of an employee in the employee list. Should not be empty. |
Return to the Table of Contents
Features
Employee-related commands
personadd: Add an employee
Adds a new employee to the system with the given attributes.
Rate refers to the hourly pay of the employee.
Format: personadd n/NAME p/PHONE_NUMBER e/EMAIL a/ADDRESS r/RATE [t/TAG]...
Examples:
-
personadd n/Nicole Tan p/99338558 e/nicole@stffhub.org a/1 Tech Drive, S138572 r/37.50 t/Hardware t/Seniorwill create a new employee with name “Nicole Tan”, phone number “99338558”, email “nicole@stffhub.org”, address “1 Tech Drive, S138572”, an hourly rate of $37.50, and with tags “Hardware” and “Senior”. -
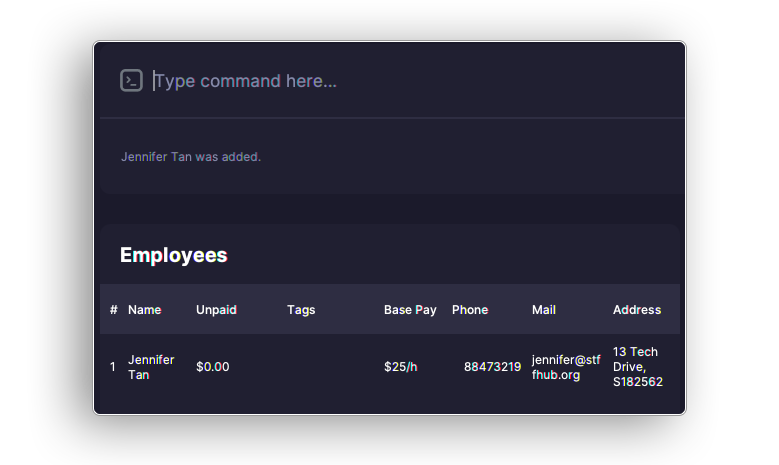
personadd n/Jennifer Tan p/88473219 e/jennifer@stffhub.org a/13 Tech Drive, S182562 r/25will create a new employee with name “Jennifer Tan”, phone number “88473219”, email “jennifer@stffhub.org”, address “13 Tech Drive, S182562”, an hourly rate of $25. No tags will be added since no tag attributes were provided.
![]() Note:
Note:
-
Attributes containing
/are not accepted. Replace/with another character (e.g.-) if any attribute contains/.For example: Use
Ravi s-o Veeganinstead ofRavi s/o Veegan, and3-5 Jalan Trusinstead of3/5 Jalan Trus. -
The maximum value for the hourly rate of an employee is $1,000,000.
Return to the Table of Contents
personedit: Edit an employee’s information
Edit the information of an existing employee. Use this in the event that an employee’s details change.
Rate updates will only take effect with jobs that are pending completion; payout amounts for already-completed (i.e. marked with mark) jobs will not change.
Format: personedit EMPLOYEE_INDEX [n/NAME] [p/PHONE_NUMBER] [e/EMAIL] [a/ADDRESS] [r/RATE] [t/TAG]...
Examples:
-
personedit 2 p/62353535changes the second employee’s phone number to 62353535. -
personedit 3 t/Hardware t/Networkchanges the third employee’s tags to “Hardware” and “Network” instead of their original tags.
![]() Note:
Note:
-
Attributes containing
/are not accepted. Replace/with another character (e.g.-) if any attribute contains/.For example: Use
Ravi s-o Veeganinstead ofRavi s/o Veegan, and3-5 Jalan Trusinstead of3/5 Jalan Trus. -
The maximum value for the hourly rate of an employee is $1,000,000.
-
When editing tags, new tags will not be added to the existing tags. Instead, all existing tags will be replaced by new tags.
-
To clear all tags, add
t/to the command without specifying any other tags.
Return to the Table of Contents
persondelete: Delete an employee
Deletes the employee referred to by the index. This also removes the deleted employee from all associated jobs.
![]() Caution:
Caution:
This is irreversible.
Format: persondelete EMPLOYEE_INDEX
Example: persondelete 3 deletes the third employee in the list.
Return to the Table of Contents
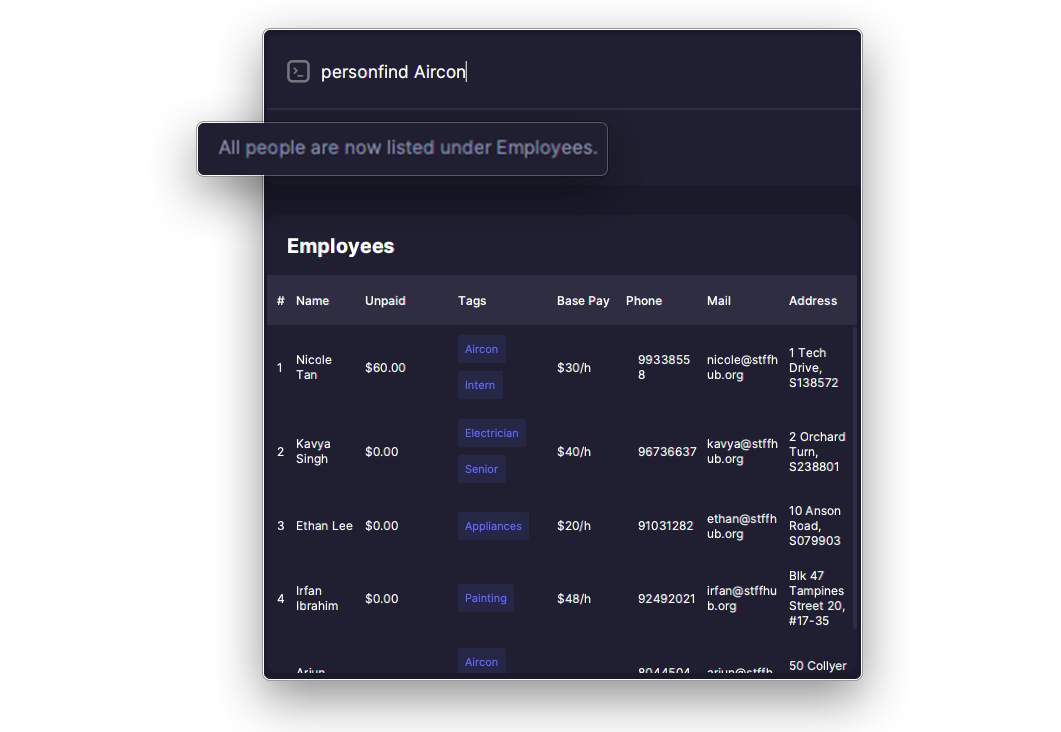
personfind: Find employees by name or tag
Finds all employees that have the given keyword(s) in their names or tags, and lists them in the employee list.
If multiple keywords are entered, only entries that match all keywords are returned.
Keywords are case-insensitive.
Format: personfind KEYWORD [KEYWORDS]...
Examples:
-
personfind Nicole Hardwarefinds all employees with “Nicole” and “Hardware” in their name and/or tags. -
personfind Nicolefinds all employees with “Nicole” in their name and/or tags. -
personfind Nicole Hardware Displayfinds all employees with “Nicole”, “Hardware”, and “Display” in their name and/or tags.
Return to the Table of Contents
personlist: List all employees
Lists all employees added to PeopleSoft.
Format: personlist
Example: personlist shows all employees.
Return to the Table of Contents
export: Export jobs done by an employee
Exports a .csv file to the data folder, containing the jobs that the employee was assigned to, including:
- job IDs,
- job descriptions,
- job statuses (incomplete, pending payment, paid),
- effective rate(s) for the employee,
- job durations, and
- the amount paid, or to be paid to the employee.
Format: export EMPLOYEE_INDEX
Example: export 3 exports the third employee in the list.
![]() Note:
Note:
This command updates the job list to show all jobs assigned to that employee.
Return to the Table of Contents
Job-related commands
add: Add a job
Adds a new job with the given attributes. DURATION refers to the duration required for the job, in hours.
Format: add n/NAME d/DURATION
Examples:
-
add n/Fix HDB Lock d/1creates a job named “Fix HDB Lock” with a duration of 1 hour. -
add n/Repair aircon d/4creates a job named “Repair aircon” with a duration of 4 hours.
![]() Note:
Note:
-
The maximum value for the duration of a job is 1,000,000 hours.
-
Multiple jobs of the same name can be added. These jobs can then be differentiated by their internal ID, the order in which they were added, and/or the employees that were assigned to it, although it can easily result in confusion. It is thus recommended that a user differentiates jobs through naming to avoid any confusion.
Return to the Table of Contents
find: Find jobs by name
Finds all jobs that have the given keyword(s) in their names, and lists them in the employee list.
If multiple keywords are entered, only entries that match all keywords are returned.
Keywords are case-insensitive.
Format: find KEYWORD [KEYWORD]...
Examples:
-
find paintfinds all jobs with “paint” in their names. -
find paint istanafinds all jobs with “paint” and “istana” in their names.

Return to the Table of Contents
list: List all jobs
Lists all jobs added to PeopleSoft.
Format: list
Example: list shows all jobs.
Return to the Table of Contents
delete: Delete a job
Deletes the job with the given index.
![]() Caution:
Caution:
This is irreversible.
Format: delete JOB_INDEX
Example: delete 2 deletes the second job.
Return to the Table of Contents
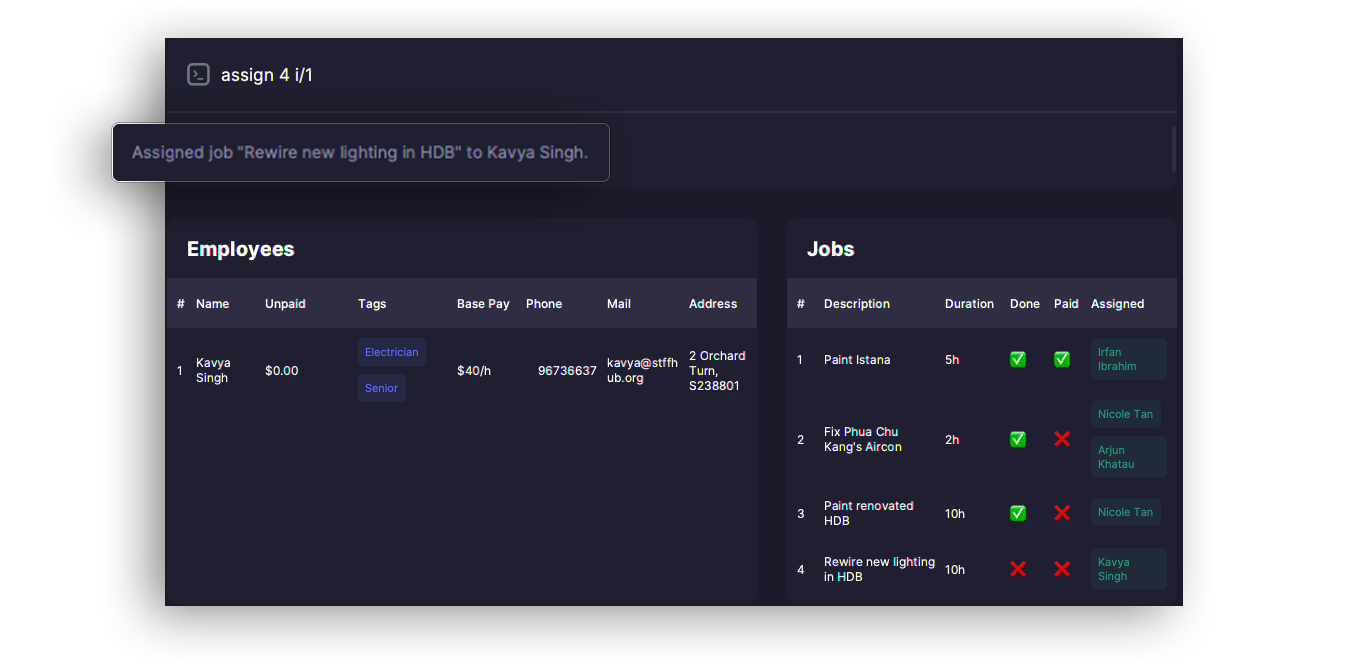
assign: Assign a job to an employee
Assigns a job to an employee to indicate that they are to be paid for the job.
Format: assign JOB_INDEX i/EMPLOYEE_INDEX [i/EMPLOYEE_INDEX]...
Examples:
-
assign 2 i/3assigns the second job to the third employee. -
assign 1 i/5 i/7assigns the first job to the fifth and seventh employees.
![]() Note:
Note:
A job that has been marked as completed cannot be assigned. If a job is completed, it makes little sense to assign more employees to it. In the event more employees need to be assigned to a job, unmark the job first before assigning them.
Return to the Table of Contents
mark: Mark or unmark a job as done
Marks a job as done if it was not already marked as done, or marks a job as undone otherwise.
Marking a job as done indicates that a job has been completed and is pending payment. Unmarking a job causes the pending payment amounts to be subtracted from assigned employees.
Jobs are initially not marked as done when first created, and have to have at least one employee assigned to it before it can be marked.
![]() Note:
Note:
The hourly rate(s) paid out to each employee for a job is fixed once the job is marked as done; further changes to any employee’s rate will not cause the payout amounts to change.
To update the payout amounts to reflect the new hourly rates, unmark and mark the job again.
Format: mark JOB_INDEX
Examples:
-
mark 1marks the first job, assuming it is not already marked as done. -
mark 1unmarks the first job if it has already been marked as done.

Return to the Table of Contents
pay: Finalize payments for a job
Finalizes the payments of a job. A job needs to be marked as done before it can be finalized.
![]() Caution:
Caution:
This is irreversible. The finalized job cannot be modified in any way, and can only be removed with clear.
Format: pay JOB_INDEX y/
Example: pay 2 y/ finalizes the payments of the second job


Return to the Table of Contents
Miscellaneous commands
clear: Clear all PeopleSoft data
Removes all data stored in PeopleSoft. Useful for removing the sample data created when PeopleSoft is started for the first time.
![]() Caution:
Caution:
This is irreversible; deleted data cannot be recovered afterwards without a backup.
Format: clear
Example: clear removes all employees and jobs from PeopleSoft.
Return to the Table of Contents
exit: Exit PeopleSoft
Exits PeopleSoft immediately.
Format: exit
Example: exit exits PeopleSoft immediately.
Return to the Table of Contents
help: Show help page
Opens the help page, which includes a list of commands, command formats, and example usages.
Format: help
Example: help opens up the help page.

Return to the Table of Contents
FAQ
Q: I’m using macOS and I can’t double-click on the peoplesoft.jar file to open it. What should I do?
A: Follow the steps here to open your jar file.
Q: What are the addressbook.log.0, config.json, preferences.json files in the same folder as peoplesoft.jar?
A: PeopleSoft uses the settings inside those files to run. For instance, the height and width of PeopleSoft is stored in those files. Do not remove or edit those files.
Q: How do I save my data?
A: PeopleSoft automatically saves application data to the folder that it was started from after every command. There is no need to save manually.
Q: How can I edit PeopleSoft data manually?
A: PeopleSoft data is saved as a JSON file under data/peoplesoft.json in the folder that it was started from. It is possible (although not recommended) to modify application data by editing that file.
![]() Caution:
Caution:
Do not edit the data directly unless you know what you are doing. If your changes cause the data file to become invalid, PeopleSoft will discard all data and start with an empty data file the next time it is started.
Q: Can I get back the initial sample data?
A: Deleting the data/peoplesoft.json file and restarting PeopleSoft will cause the sample data to be reloaded.
Q: How do I transfer my data to another computer?
A: Install PeopleSoft on the other computer and overwrite the data/peoplesoft.json file it creates with your existing data/peoplesoft.json file.
Q: How do I report a bug? How do I suggest a feature?
A: You may report a bug or suggest a new feature on the PeopleSoft issue tracker.
Return to the Table of Contents
Glossary
CLI: Command-line interface. A primarily text-based interface, which is typically operated with text commands.
CSV: Comma-separated values. A common file format for storing tabular data, similar to a spreadsheet.
GUI: Graphical user interface. A primarily visual interface, which is typically operated by a pointing device.
Index: The item’s number that is displayed in its respective list, e.g. the second employee in the list has an INDEX of 2.
JAR: Java ARchive. A file format used to collate Java class files and their resources for distribution. Java applications are commonly distributed as .jar files.
JSON: JavaScript Object Notation. A structured file format used to store arbitrary text data. This is the file format used by PeopleSoft to store data and settings.
Keyword: A word to search for in a set of data, e.g. in the list of employees or jobs.